Over the years since the 2007 JavaOne announcement of JavaFX, I have been somewhat critical of what it has to offer. After Oracle's announcement at JavaOne 2010 that JavaFX would abandon the proprietary JavaFX Script and instead support standard Java APIs, I began to wonder if it was time to invest in learning JavaFX. With the JavaOne 2011 announcements that Oracle intends to pursue standardization of JavaFX as part of Java SE and to open source JavaFX, it is now an easy decision to invest time and energy into learning JavaFX 2.0. In this post, I publicly begin that process. The last couple times I looked at JavaFX, I stopped after feeling disillusioned and resentful. I am expecting better results this time.
One of the announcements at JavaOne 2011 was the general availability of JavaFX 2.0 for Windows. A related significant announcement was the release of JavaFX 2.0 Developer Preview for Mac OS X. For purposes of this post's examples, I downloaded the JavaFX SDK (which includes the JavaFX 2.0 runtime) for Windows.
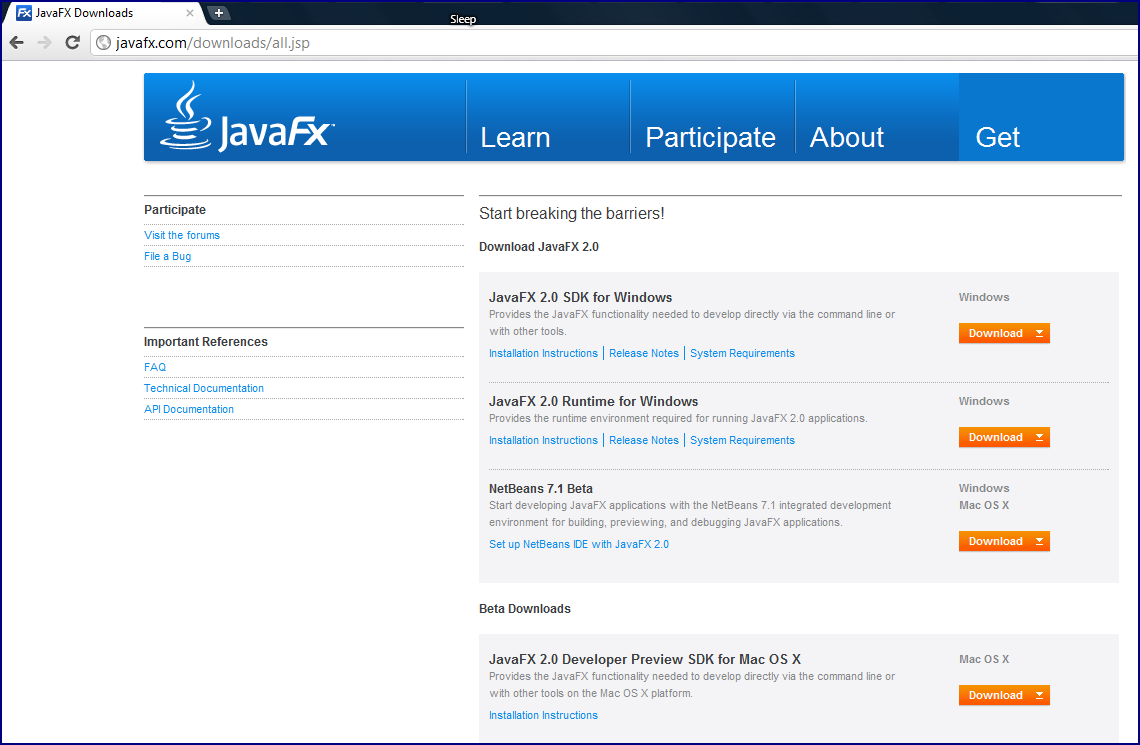
The default installation directory for the JavaFX 2.0 SDK and runtime in my case is C:\Program Files\Oracle with the SDK installed in directory C:\Program Files\Oracle\JavaFX 2.0 SDK and the runtime installed in directory C:\Program Files\Oracle\JavaFX Runtime 2.0.

Although JavaFX applications be be built from the command-line, I'm going to build my first one with NetBeans. NetBeans 7.1 beta supports JavaFX 2.0, though JavaFX 2.0 SDK should be downloaded separately as I discussed above.

As usual, I downloaded the 'All' version of NetBeans 7.1 beta because I want the support for Groovy, Java EE, PHP, and C/C++ along with the support for Java SE and JavaFX. A person who doesn't want all of that, but does want JavaFX support can download the Java SE or Java EE bundles instead of the 250MB+ All bundle.

Getting Started with JavaFX is an excellent introduction to creating a first JavaFX application. However, my first example here will be even simpler than that one and is essentially a JavaFX version of Hello World.
Once NetBeans 7.1 (beta) is available, I can create a new Project in NetBeans 7.1 that is a JavaFX project. This process follows the normal approach in NetBeans of creating a new project via using of CTRL+SHIFT+N or right clicking in the "Projects" tab and selecting "New Project...." The following three screen snapshots show my configuring of this NetBeans 7.1 beta JavaFX project. In this case, I'm creating a JavaFX FXML project. The "Activating..." is required because this is the first time creating a JavaFX project in this newly installed NetBeans 7.1 beta installation.


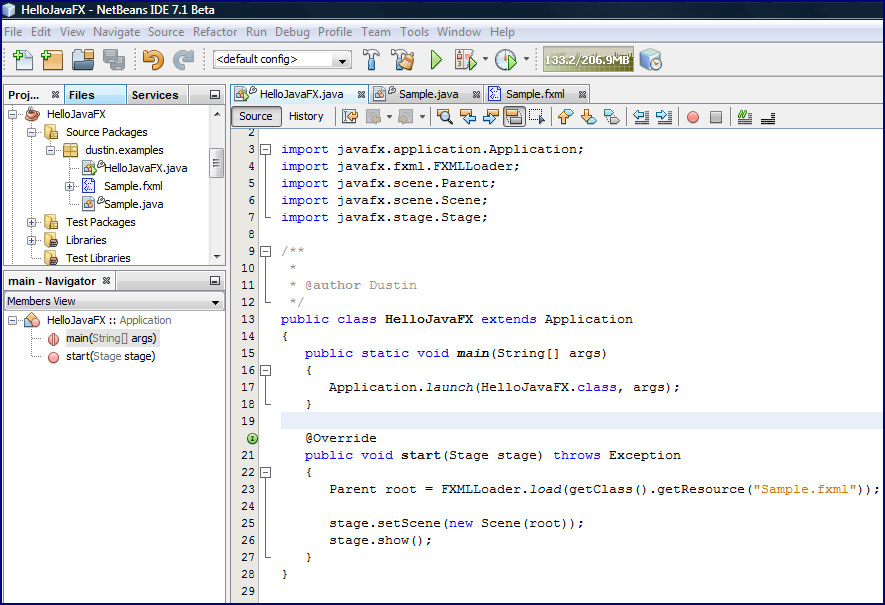
Once I clicked on the "Finish" button to create this JavaFX project, three files were generated. These are HelloJavaFX.java, Sample.java, and Sample.fxml. The following three screen snapshots show all three of these files.


It is interesting to see what files NetBeans 7.1 beta generates for the JavaFX project after clicking "Build" on the project. This is shown in the next screen snapshot.

As the last image indicates, there is an HTML file generated in the 'dist' directory along with a JAR and a JNLP file.
As part of this example, I slightly changed the generated Sample.java to report "Hello JavaFX 2.0" (from "Hello World") when the button is clicked. The revised source code is shown next along with the original NetBeans-generated code for Sample.fxml and HelloJavaFX.java.
The generated HelloJavaFX Java class extends Application (Javadoc documentation calls this the "entry point for JavaFX applications") and features the normal static main function as well as an overridden start(Stage) method. It references the Sample.fxml in that start method where it loads the FXML content via FXMLLoader.
package dustin.examples;

import javafx.application.Application;
import javafx.fxml.FXMLLoader;
import javafx.scene.Parent;
import javafx.scene.Scene;
import javafx.stage.Stage;

/**
 *
 * @author Dustin
 */
public class HelloJavaFX extends Application
{
   public static void main(String[] args)
   {
      Application.launch(HelloJavaFX.class, args);
   }

   @Override
   public void start(Stage stage) throws Exception
   {
      Parent root = FXMLLoader.load(getClass().getResource("Sample.fxml"));

      stage.setScene(new Scene(root));
      stage.show();
   }
}
The FXML file referenced by HelloJavaFX above is shown next. This file specifies its 'controller' as the Sample.java class.
<?xml version="1.0" encoding="UTF-8"?>

<?import java.lang.*?>
<?import javafx.scene.*?>
<?import javafx.scene.control.*?>
<?import javafx.scene.layout.*?>

<AnchorPane id="AnchorPane" prefHeight="200" prefWidth="320" xmlns:fx="http://javafx.com/fxml" fx:controller="dustin.examples.Sample">
   <children>
      <Button id="button" layoutX="126" layoutY="90" text="Click Me!" onAction="#handleButtonAction" fx:id="button" />
      <Label id="label" layoutX="126" layoutY="120" minHeight="16" minWidth="69" prefHeight="16" prefWidth="69" fx:id="label" />
   </children>
</AnchorPane>
The Sample.java class shown next is the class that I slightly tweaked from the NetBeans-generated version. This class implements Initializable and the initialize method. It also demonstrates use of the @FXML annotation, which designates that the annotated attribute and method are accessible from FXML markup.
package dustin.examples;

import java.net.URL;
import java.util.ResourceBundle;
import javafx.event.ActionEvent;
import javafx.fxml.FXML;
import javafx.fxml.Initializable;
import javafx.scene.control.Label;

/**
 *
 * @author Dustin
 */
public class Sample implements Initializable
{
   @FXML
   private Label label;

   @FXML
   private void handleButtonAction(ActionEvent event)
   {
      System.out.println("You clicked me!");
      label.setText("Hello JavaFX 2.0!");
   }

   @Override
   public void initialize(URL url, ResourceBundle rb)
   {
      // TODO
   }
}
From within NetBeans, it is easy to run the JavaFX application. Right-clicking on the JavaFX project in the "Projects" page of NetBeans 7.1 beta and selecting "Run" is depicted in the following screen snapshot.

Once the NetBeans-generated (and slightly modified) JavaFX application is run in NetBeans, a pop-up appears and is updated with the "Hello" message when its only button is clicked. The next two screen snapshots attempt to demonstrate these events in static presentation.


The last two images shown above demonstrate that the expected messages do appear. The "Hello" message is partially shown and the message sent to standard out appears in the ""Output" pane at the bottom of the IDE.
ConclusionJavaFX has new life with JavaFX 2.0 and Oracle announcements regarding JavaFX's future at JavaOne 2010 and at JavaOne 2011. In this post, I have demonstrated building a simple JavaFX application and deploying it locally with NetBeans 7.1 beta. Although the example is extremely simple, it does demonstrate a few key classes in JavaFX as well as FXML and interaction between the classes and markup. Thanks, NetBeans 7.1, for the introduction!
No comments:
Post a Comment